I learned how to make these mini waterfall albums years ago. These are so easy to make and make a great gift. I recently resurrected this idea because I had some photos that needed a home, but they were for specific events that would not fill up a larger album. The paper crafter in me could not stick these in an album with sleeves. I needed to find a more suitable place to display my pictures.
This mini album only took me about an hour, including selecting the materials and cutting the papers. After that, it comes together quickly because all you have to do is glue it all together. Let’s get started!
Step 1: Choose the Materials
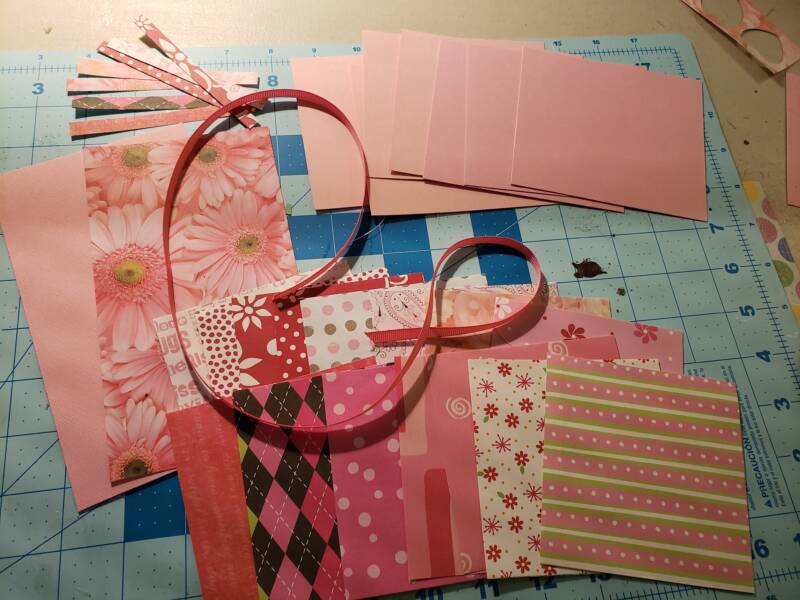
Choosing the paper is the most fun step when making this waterfall album. You can use a paper pad with coordinating paper or go through your paper stash to match up coordinating paper. On this day, I went through my stash. You could also use themed paper if this is an album for a holiday or special event.

A couple of things to keep in mind when selecting the paper are that you will need to select what you want for the front and back cover. You can use the same paper, or you can choose something different. You will also need to select paper for the inside pages of the album. Each page on the inside has three papers: two larger squares and a small strip in between them. The three pieces on each page should be coordinated.
A ribbon finishes the album at the end of the project, so it is a good idea to select a ribbon that coordinates with all the papers. You will also need some embellishments to decorate the pages. Once all the materials are gathered, you can begin cutting the paper and ribbon.
Step 2: Cut the Paper
Choose solid-colored cardstock. Cut a 4-1/2″ X 7″ piece for the base.
Cut 7 pieces 4-1/2″ X 4″ using the same cardstock. These are the pages.
Choose the scrapbook paper for the front cover. Cut the paper 3-1/2″ X 3-1/2″.
Choose the scrapbook paper to mat the back side of the base. Cut this piece to 4-1/4″ x 6-3/4″.
Cut 14 coordinating pieces of scrapbook paper 3-1/2″ X 3-1/2 “. These will mat the inside pages.
Cut 7 pieces of scrapbook paper into 3-1/2″ X1/8″ strips to place between each page.
Cut a coordinating piece of ribbon about 30″ for the fastener.
Step 3: Prepare the Base and Pages
Using the 7 pieces of 4-1/2″ x 4″ squares of cardstock, score each piece along the 4-1/2″ side at 1/2″.

Fold and crease the score marks, then burnish them down with a bone folder. Repeat with the remaining 4-1/2″ X 4″ square pieces.

Apply double-sided tape to the outside of the flap of one of the pieces you just cut, as shown below.

Attach the flap to the top edge of the base that is 4-1/2 ” x 7″. You want to make sure that the top edge of the flap and the top edge of the base are as straight as possible because this first piece will directly affect the album’s alignment.

With another of the square pieces, adhere the adhesive to the flap and place the top edge flush with the bottom edge of the top first page. If you have aligned the top page properly, the rest of your waterfall album should be straight. If it looks crooked, you may need to adjust the top piece because it will affect the alignment of the rest of the pieces.

Repeat with the remaining scored pages.


Step 4: Attach the Scrapbook Paper
Adhere the 3-1/2″ x 3-1/2″ scrapbook paper square intended for the front cover with some double-sided tape.

Open the mini album to the first set of pages. Choose two of the 3-1/2″ x 3-1/2″ scrapbook paper squares that coordinate as well as one of the 3-1/2 x 1/8″ strips. Use the larger squares to matte the pages. Adhere the strip of scrapbook paper between the two pages. Repeat with the remaining pages.

After all the squares and strips are attached, you are ready to adhere to the back panel and ribbon. Situate the ribbon in the center across the back side of the album lengthwise so that it easily crosses over in the middle of the front to tie a bow. Adjust accordingly. Use double-sided tape on the back of the album to hold the ribbon in place.

Then, stick down the paper for the back panel over the ribbon you just stuck down.

Step 5: Embellishing
Now, the fun part! Embellish the album on each page using any embellishments you want. Below is a video walkthrough of a completed waterfall album. I thought this might be the best way to show how one is decorated.

